(originally written for several editions of the Ice Dragon newsletter [SCA/Hael])
Not to long ago Master Charles of Alden asked if I would make him a new leather cover for his axe. I set about the project and was reasonably pleased with the results. As a result I was asked to do a short article on the process. Shortly after finishing the axe cover for Master Charles I was asked to do a second axe cover. I decided I would write the article on the process of making the second cover since I was starting from scratch and had a better chance to document the steps. This is a rather large tutorial so instead of doing it all in one go, I will break the process up over a few articles.
Let me start off by saying that I am by no means an expert leather worker. Most of my skills are self taught and my tools are what I have at hand. This process is how I went about the project, but is no way the end all or be all of tutorials.
Lets take a look at the first completed axe cover to see what the finished product looks like. The axe cover is made up of several layers of thick leather so that the leather and not the seams take the stress of day to day use. This will greatly increase the life span of the sheath.

Materials list for the first part of the tutorial:
- A sheet of stiff poster board or similar pattern material.
- Marking pen.
- Scissors or craft knife.
- Leather shears or craft knife.
- About
When I start a project I always make a pattern. Making a pattern gives a low cost mock up of the finished project to check for proper fit and cosmetic “look”. I make the pattern out of stiff poster board, but thin card board or even paper will work in a pinch. Never be afraid of trial and error in this part of the process. A little extra time and some wasted paper can save a lot of time and money later.

The pattern for the axe cover consists of two pieces; the face of the cover and a spacer piece. To create the face simple lay the axe on the card stock and trace the shape of the axe. Add about ½ to this to allow room for stitching. The spacer is created by cutting out the extra half inch left for the stitching as seen in the following photo.

Once the basic pieces are cut out lay them on the axe to get a general feel for how the cover will look on the axe. In my first axe cover the leather almost completely covered the axe head, but for the second cover the owner wanted more of the axe exposed. I had to take this into consideration when drafting the pattern leaving as much of the axe head exposed while still covering the sharp pointy bits.

Now that I have a functional pattern I am ready to lay it out on the leather. For this project I used a fairly think cut of leather (11-12 ounce ). It is possible to use thinner leather, but it may require additional spacer pieces to achieve a comfortable fit. Thin garment leather will not work for this. You are looking for leather thick enough to keep the axe some easily cutting through during general use. For both axe covers I used cow hide. You will need to trace out a total of four pieces on the leather. Two face pieces and two spacers. It is important to remember to flip the face piece pattern over for the second piece so you end up with the leather facing out the correct way on both sides.

To cut out the pieces I use an exact-o knife and a pair of leather shears. I start by scoring the surface of the leather with the knife and finish by cutting the pieces out with the shear. You can cut the pieces out with just a knife, but if you are not careful you can end up with rough or uneven edges. Likewise you can use just shears, but cutting through thick leather can get rough on the hands. In either case always use sharp tools. Dull tools make cutting hard and can result in injuries. Always cut safe.

Once the pieces are cut out I like to do a test fit by holding the pieces together with simple clamps. Make sure the axe cover fits properly and also think about how the axe cover will come on and off. For this axe cover the closure will be a simple tie at the bottom back of the axe. This is not designed as a quick release, nor does it need to be.

Making an axe cover
part two: Tooling
I will briefly describe tooling the axe cover. Let me start by cementing
the fact that I am not an artist or a master leather worker! I learned to tool
leather mostly by watching other people and self teaching, so this is not the
end all of methods.
Materials list for the second part of the tutorial:
- The
leather pieces from part one.
- The
design for tooling.
- A
leather stylus (other modeling tools are optional)
- A
sponge (NEW)
- A bowl
for holding water.
A note on buying
tools: I buy most of my tools and supplies locally at M. Steffan's Sons, Inc.761 Main Street ;
Buffalo , NY
14203
For this project the tooling requested was the Kingdom
Populace Badge (hopefully I described this correctly). Since I have no free
hand skills I downloaded a picture from the following source: http://www.aeheralds.net/badges.html#awards.

I resized the image in an MS word document until it was the
correct size for the project. I suspect someone with math skills could figure
this out in one shot, but I opted for the trial and error method. Once I had
the correct size worked out I printed the image out on normal paper and trimmed
it to size creating a template for transferring the design to the leather.
People with good free hand drawing skills could easily drawn the design onto
the leather without the need for the paper template.
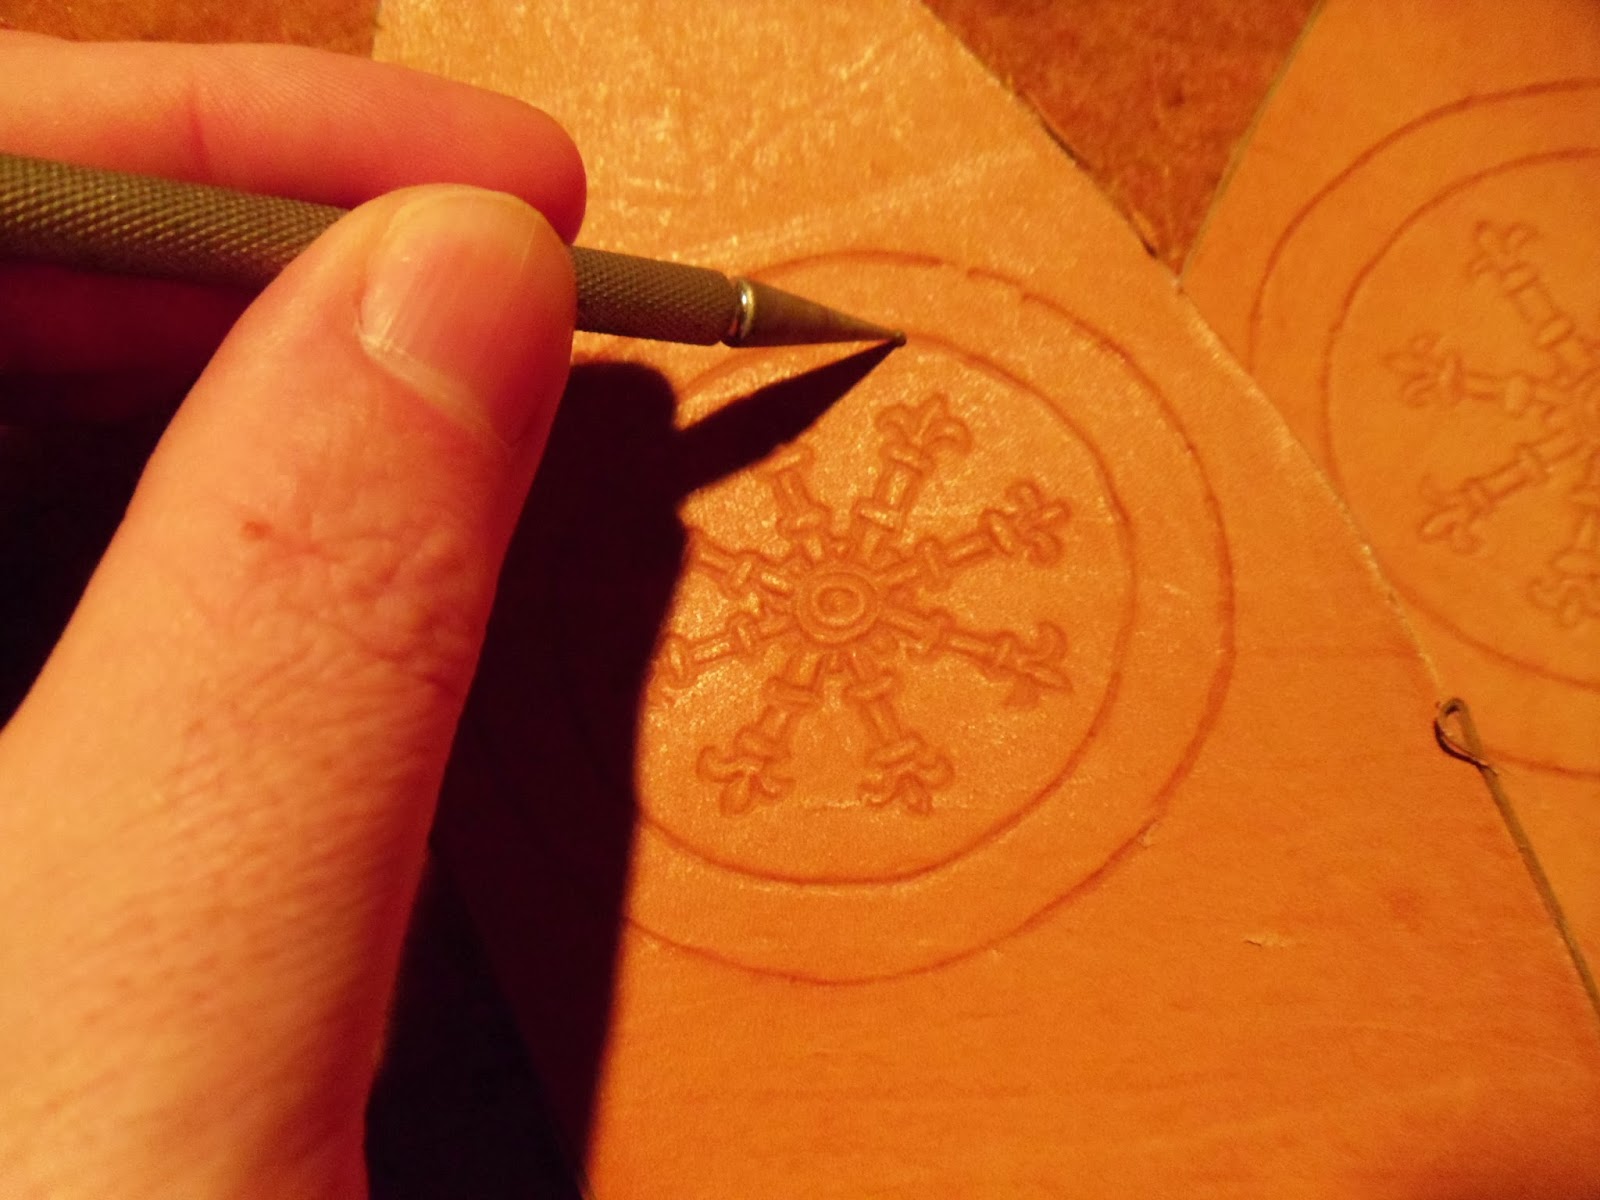
To transfer the design to the leather I wet the leather with
a sponge, lay the template in the correct place, and use a stylus to trace the
pattern onto the leather. When wetting the leather apply a small amount of
water to the entire surface of the
leather. Never apply water to small areas as this may cause discoloration in
the final product. Do not move the template until the design is fully
transferred. Odds are if the template moves the design will shift position, get
off center, or otherwise get messed up! Once the design is transferred to the
leather it will look a bit like this.

At this point it is okay to weather the leather again
(remember the words of warning from above) and clean up the lines with the
stylus as seen here.
This level of tooling is enough to leave a design in the
leather and is a good stopping point for basic leather workers. The stylus will
leave a deep enough imprint in the leather that the design will stand out
without the need for more advanced techniques or additional tools. Using a few
more techniques can create a nicer effect, but explaining them is probably best
left to hands on experience with a proper teacher. To give an example of what I
mean here is a shot of my final tooling on the axe cover after a bit more work.

I did most of this additional tooling with the stylus and a
modeling tool called a spoon (as seen below. Image from www.tandyleatherfactory.com).
Simply wet the leather and use the spoon and stylus to deepen or sharpen the
image in the leather.

Making an axe cover
part three: Assembly
Last month I failed to provide the continuation of the
tutorial on building axe covers. The outrage and hate mail has continued to
flow in, so this month I am back on track! (Just kidding, I am not sure anyone
noticed it was missing). This month I will cover assembling the pieces of the
axe cover and stitching the project.
To start out I am going to cheat by providing a link to
another tutorial (not of my creation and with credit to the owner) on how to
stitch leather. This will both save space in the news letter and provide a much
smoother explanation of the process. I suggest the following site:
I suggest reading the entire stitching tutorial, but you
will notice as you read further that I deviate from some of the steps. I did
this for two reasons. First my method is a bit easier to do given the nature of
project, and second it makes use of the tools I have on hand.
The tools and supplies I used for this part of the process
include:
- Contact
cement (I use the DAP brand)
- Applicator
for the glue
- Two
heavy stitching needles (I suggest picking up needles meant for leather)
- Spool
of heavy waxed thread
- Drill
bit
- Bench
mounted drill press or hand drill
- Pen
- Ruler
- Craft
knife
- Sander
(I use a belt sander, but sand paper will work just as well). I suggest a
medium to fine grit.
This part of process involves some power tools, knives, and
sanders. Please observe all proper safety precautions when using these tools.
Always use tool in the proper manner as directed by the instructions provided.
Eye protection is a must. There is no way you can finish the project minus a
pair of eyes!
Assembling the
pieces:
The first step in the process is assembling the pieces so
they can be stitched. There are several schools of though on this. One is
punching all the holes in the pieces and then stitching them together using the
stick to draw them together. The second is to use clamps to hold the pieces,
punch the holes, and then stitch using the clamps to hold everything in order.
Lastly is my method, or as I like to call it “The Red Green” method. (Check out
http://www.redgreen.com if you don’t
know who Red Green is).
I use contact cement (DAP branch is what works for me) to
glue the pieces together prior to stitching. Sadly I did not snap a picture of
this, but the remainder of the photos in this section should give a good idea
of how the glued pieces should look. It is important to line the pieces up
correctly while gluing, but exact alignment is not required. Try to be neat
with the glue, and be very carefully not to get glue on the tooled sides of the
leather! I suggest gluing the pieces in stages to give them time to dry
properly. Don’t rush it. Once all the pieces are glued in place let the project
set for a good 24 hours before moving on. At this point it is safe to try a
test fit with the axe to make sure everything is lining up correctly.
Once the pieces are glued you will need to mark where the
stitching holes. I suggest placing your stitch line about ¼ of an inch from the
edge of project, with holes at no greater than ¼ inch apart. This will make for
a nice clean stitch. I used a simple pen to mark the holes, but a pencil will
work also.

To punch the holes in the leather I use a bench mounted
drill press. I think some professional leather workers might cringe at this
suggestion, but it is a quick, easy, and clean method. The trick is to take
your time. Don’t rush! If you do not have access to a bench mounted drill
press, a hand power drill will work as well. Using a hand drill will require a
steadier hand, but is not impossible. If you don’t feel comfortable using a
drill to punch the holes stick closer to the guidelines provided in the
stitching tutorial provided above.

This photo shows the finished holes. The drill press might
leave some rough edges. Clean these up with a craft knife if you like.

The next step is stitching the leather. In interest of space
follow the stitching tutorial provided above. Remember the tutorial is only
meant as a guide, and I deviate from it at several points. For example I don’t
use natural linen thread. I use pre-waxed thread available at any craft store. It comes in several colors and saves the step
of having to wax your own thread. The color thread you use will have an impact
on the cosmetic look of the final project based on the color of dye you plan to
use. If you plan on using a light dye, I suggest using a light color thread,
dark dye, darker thread, etc. Once the project is stitched together it is time to clean up
the edges. If there are any long edges carefully remove them with a craft
knife.

The best method to clean up the edges of the project is with
a medium to fine grit sander. I use a bench mounted belt sander because it
produces an even clean edge with very little effort. If a bench mounted belt
sander is not available (or you don’t feel comfortable using one) simple sand
paper will work just as well.

This is how my finished edge looks after sanding.


Making an axe cover part four: finishing the project
This part of the tutorial covers the coloring of the tooling, dying
of the leather, and finishing of the edges.
What you will need for this part of the project:
- Acrylic paint in the colors required for the choice of art work
- Basic paint brushes
- Foam brushes for applying leather dye and or stain
- Edge slicker
- Edge finisher
- Leather dye or stain
- Leather finish
- Gloves (Latex or rubber)
Coloring the leather:
There are several products used to color leather. The most
common products I use are stains and dye. The colors produced by stains are not
as drastic, and allow the rich depth and natural look of the leather to show
through in the final product. Dyes tend to create a singular, often flat color
effect. For this project I picked Fiebings Golden Oak leather stain (as seen
below). It creates a rich but not overly dark color. Simply apply the stain in
thin even coats using a foam brush and wipe off the excess with a clean soft
rag. The stain will run a bit so work in a safe area and using gloves (latex
for example) is a great idea for easy clean up.

To add more detail I opted to dye the flat edge of the
project with a darker stain. This is a bit fiddly, and requires a steady hand,
so consider this step optional. If you don’t have darker stain or dye a similar
effect can be achieved by applying several coats of the lighter stain until it
darkens. If a darker stain is used there is the risk it will bleed, drip, or
run onto the lighter sides of the project. They make products that can be
applied to prevent this, but I find they can blemish the finish so I don’t use
them.

The next step is to smooth (slick/finish) the edges of the
project. This is not required, but does give the product a finished
professional look. To slick the edge I use a product called gum tragacanth made (or at least originally made)
from the sap of a Middle Eastern legume. It’s a waxy gel like substance that is
applied to the edges of leather and burnished with a smooth tool called a
“slicker”. Simply apply the gum to the edges of the project and burnish (work
in) until a smooth finish is achieved. If you don’t have access to a slicker
you can use a plastic spoon or similar smooth object.

After allowing the stain to dry for at least 24 hours the
product is ready for painting. Normally I don’t like painting leather tooling
because it takes away from a bit of the natural look of the leather. In projects
like this however very sharp colors are needed to achieve the desired effect,
and for me paint is the easiest way to accomplish this. Using normal acrylic
craft paint I carefully painted the inner part of the Aethelmearc Escarbuncle
white. Once this was dry I added some detail and shading with a touch of black
paint as seen below.

When this was dry I filled in around the Escarbuncle with
red paint. Depending on the colors used in the project additional coats of
paint may be required. Allow previous layers of paint to dry before applying
additional layers. This prevents a thick buildup of paint that can reduce the
quality of the finished product and may cause cracking. Likewise if the paint
is going on too thick add a bit of water to the paint to thin it.

Finally the outer edge of the
Escarbuncle is painted yellow. As an option the lines between the red
and yellow as well as the line between the yellow and the leather (noted with
the black arrows below) can be outlined in black paint. I thought it would look
a bit heavy handed so I opted to leave it as shown below.

Once the paint is dry (allow 24 hours or more for this), the
product is coated in leather finish to seal and water proof the paint and
leather. I use simple spray on Super Shene (seen below). There are superior
products, but I find Super Shene gets the job done and is easy to use. Give the
Super Shene a good hour to dry before handling the cover.

After a long road the project is done. I’ll admit I glossed
over a few finer steps in order to keep this tutorial at a reasonable size.

Done!
No comments:
New comments are not allowed.